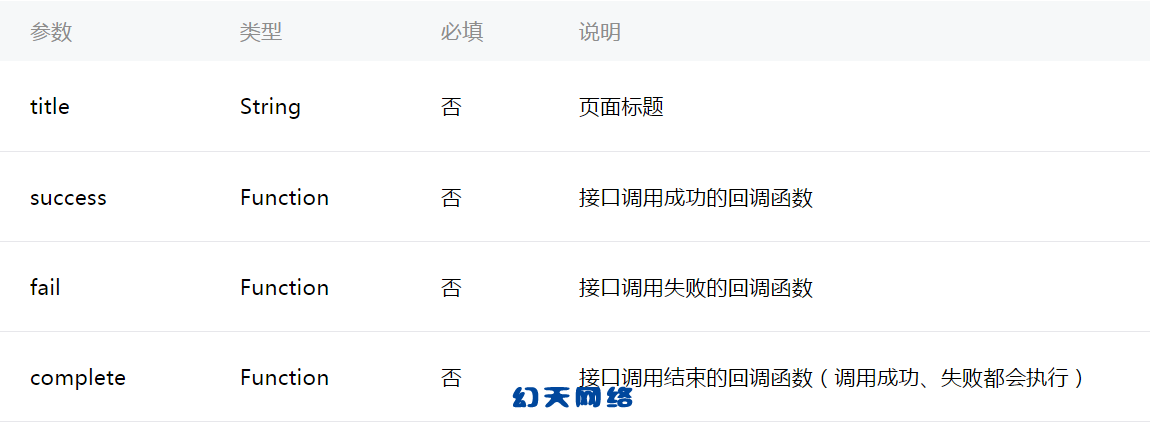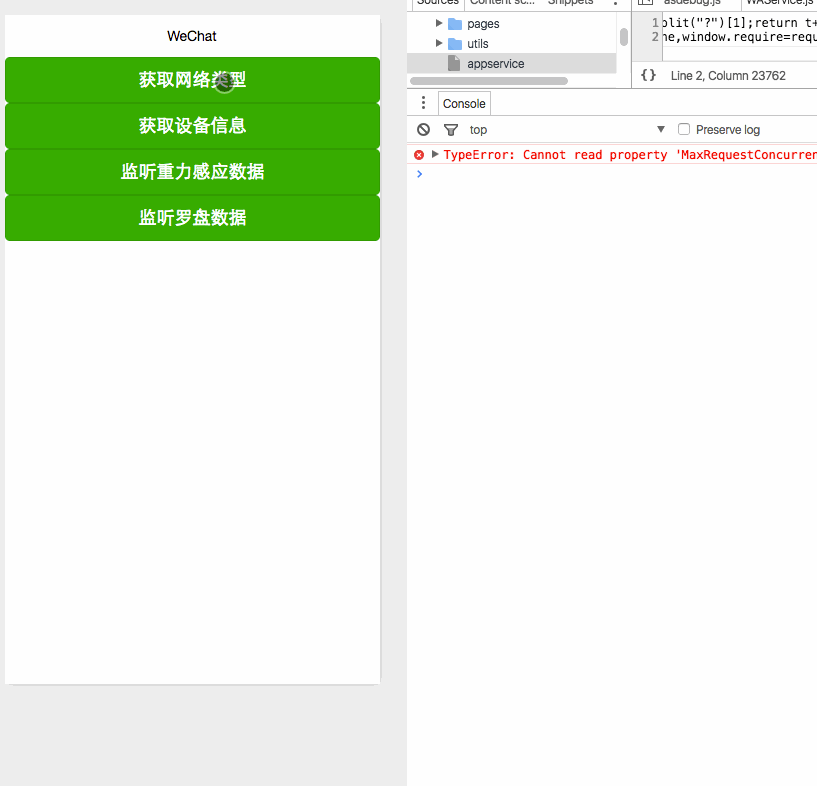
获取设备信息这里分为四种,
主要属性:
-
网络信息wx.getNetWorkType,
-
系统信息wx.getSystemInfo,
-
重力感应数据wx.onAccelerometerChange,

wxml
<button type="primary" bindtap="getNetWorkType">获取网络类型</button>
<button type="primary" bindtap="getSystemInfo">获取设备信息</button>
<button type="primary" bindtap="onAccelerometerChange">监听重力感应数据</button>
<button type="primary" bindtap="onCompassChange">监听罗盘数据</button>1
js
Page({
data:{
text:"Page system"
},
onLoad:function(options){
},
getNetWorkType: function() {
wx.getNetworkType({
success: function(res) {
console.log(res)
}
})
},
getSystemInfo: function() {
wx.getSystemInfo({
success: function(res) {
console.log(res)
}
})
},
onAccelerometerChange: function() {
wx.onAccelerometerChange(function(res) {
console.log(res)
})
},
onCompassChange: function() {
wx.onCompassChange(function(res) {
console.log(res)
})
},
onReady:function(){
},
onShow:function(){
},
onHide:function(){
},
onUnload:function(){
}
})
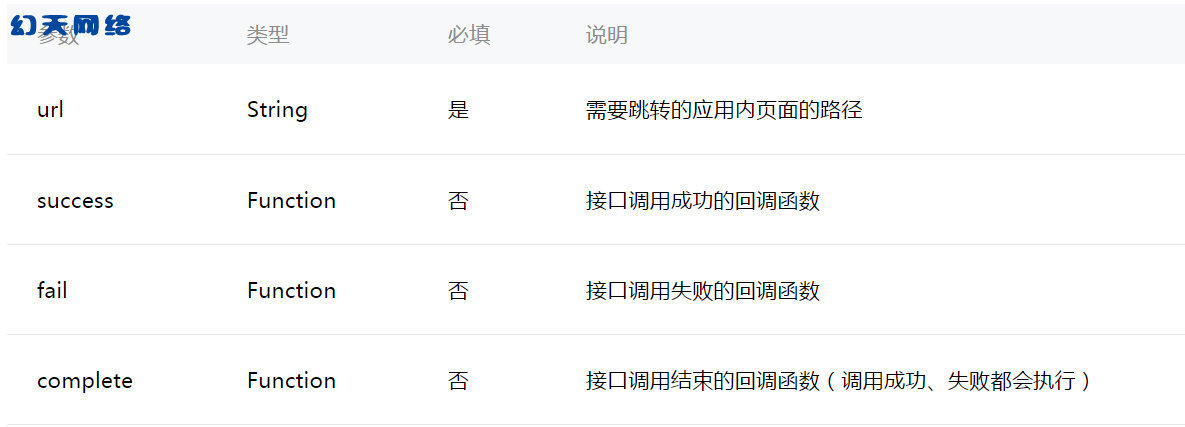
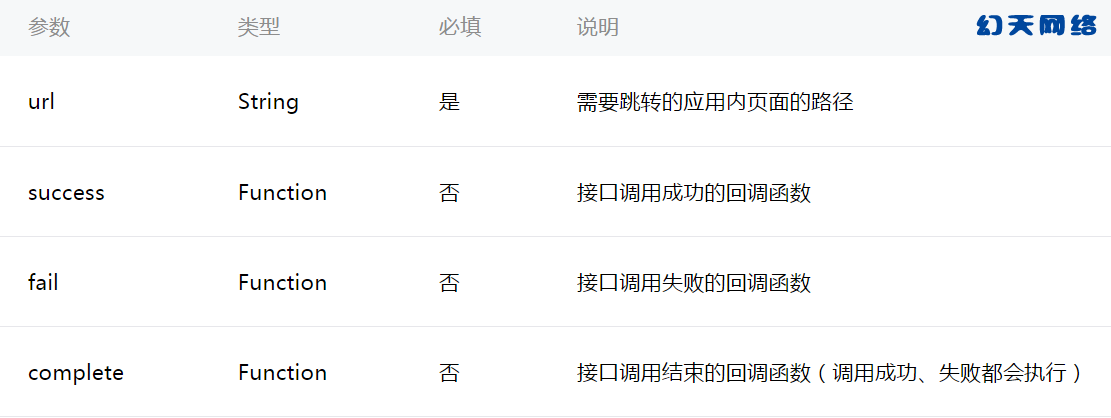
二:navigation API
主要属性:
导航条一些方法
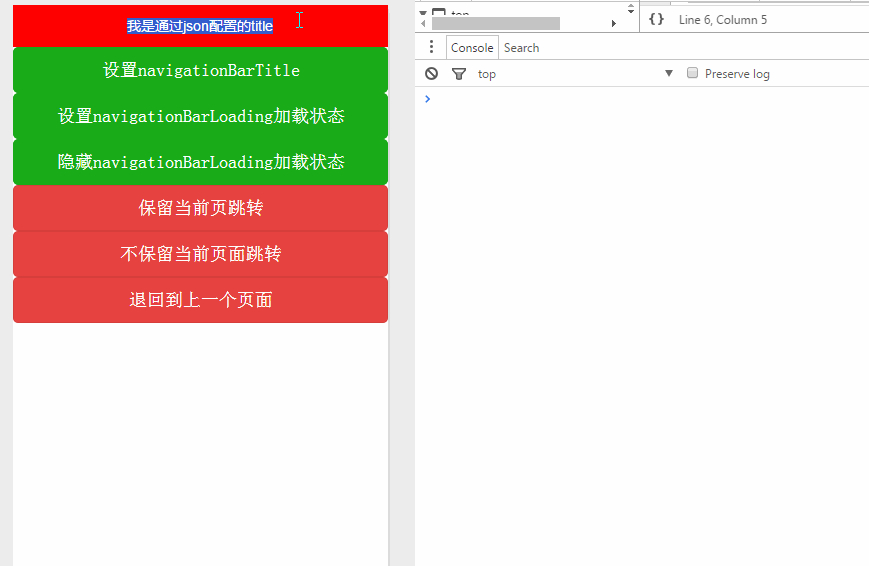
wx.setNavigationBarTitle(object) 设置导航条的Title
导航标题可以通过我们常州微信公众平台-幻天网络三种方式设置,第一种是通过全局配置名字统一,第二种就是在page中新建个json文件配置它会覆盖全局配置的title,第三种就是通过API设置。
wx.showNavigationBarLoading()设置在导航条上显示Loading加载状态
wx.hideNavigationBarLoading() 隐藏Loading加载状态
导航视图的一些方法
wx.navigateTo() 保留当前页面进行跳转,传参时就像拼接GET参数一样即可,代码中会有体现
wx.redirectTo() 销毁当前常州企业培训页面进行跳转,
wx.navigateBack() 返回上一个页面
wxml
<button type="primary" bindtap="setNavigationBarTitle">设置navigationBarTitle</button>
<button type="primary" bindtap="showNavigationBarLoading">设置navigationBarLoading加载状态</button>
<button type="primary" bindtap="hiddenNavigationBarLoading">隐藏navigationBarLoading加载状态</button>
<button type="warn" bindtap="navigateTo"> 保留当前页跳转</button>
<button type="warn" bindtap="redirectTo"> 不保留当前页面跳转</button>
<button type="warn" bindtap="navigateBack">退回到上一个页面</button>
json
{
    "navigationBarTitleText": "我是通过json配置的title"
}
js
var file = '../audio/audio'
Page({
data:{
text:"Page navigation"
},
onLoad:function(options){
},
/**
* 设置NavigationTitle
*/
setNavigationBarTitle: function() {
wx.setNavigationBarTitle({
title: '我是通过API设置的NavigationBarTitle'
})
},
/**
* 设置加载状态
*/
showNavigationBarLoading: function() {
wx.showNavigationBarLoading()
},
/**
* 隐藏加载状态
*/
hiddenNavigationBarLoading: function() {
wx.hideNavigationBarLoading()
},
/**
* 保留当前Page跳转
*/
navigateTo: function() {
wx.navigateTo({
url: file + '?phone=18939571&password=1992',
success: function(res) {
console.log(res)
},
fail: function(err) {
console.log(err)
}
})
},
/**
* 关闭当前页面进行跳转当前页面会销毁
*/
redirectTo: function() {
wx.redirectTo({
url: file + '?phone=189395719&password=1992'
})
},
/**
* 退回到上一个页面
*/
navigateBack: function() {
wx.navigateBack()
},
onReady:function(){
},
onShow:function(){
},
onHide:function(){
},
onUnload:function(){
}
})
三:animation API
动画水还是比较深的,这里只是简单介绍下小程序中动画的一些属性和注意事项,做动画前一定要整理好思路将动画一步步分解,再进行组合!这里只做引入。
wx.createAnimation(object)
-
看官方介绍
-
1.创建一个动画实例animation。调用实例的方法来描述动画。最后通过动画实例的export方法导出动画数据传递给组件的animation属性。
-
2.调用动画操作方法后要调用 step() 来表示一组动画完成,可以在一组动画中调用任意多个动画方法,一组动画中的所有动画会同时开始,一组动画完成后才会进行下一组动画。step 可以传入一个跟 wx.createAnimation() 一样的配置参数用于指定当前组动画的属性
这还是比较好理解的比如第一条对应代码animation: this.animation.export()
第二条比如缩放动画,也就说是一组scale,scaleX, scaleY…为一缩放动画组的一个动画方法,缩放动画组和旋转动画组通过step()链接,按顺序执行。常州网站开发建设-幻天网络代码中体验吧!看效果反过来看会更容易理解
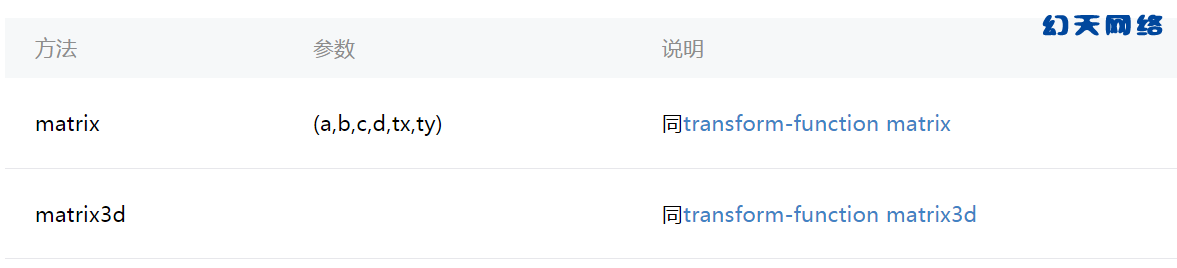
主要属性:
这里主要树下timingFunction和transformOrigin
动画组及动画方法
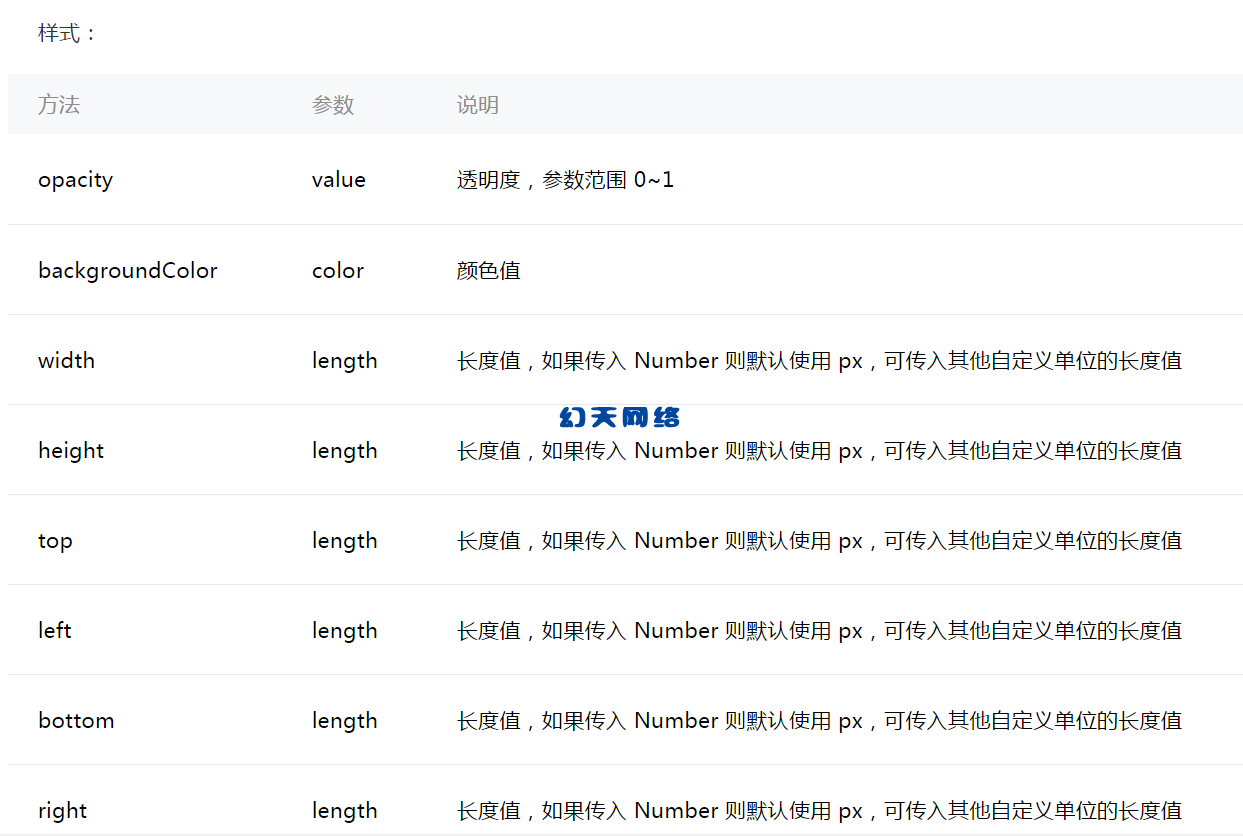
样式:
旋转:

缩放:
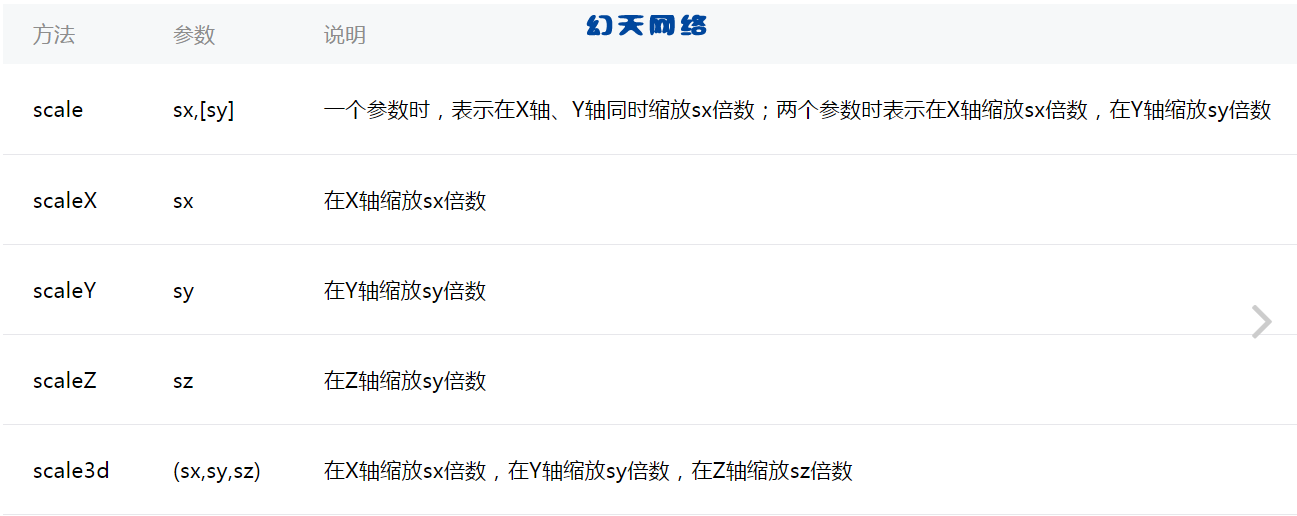
偏移:
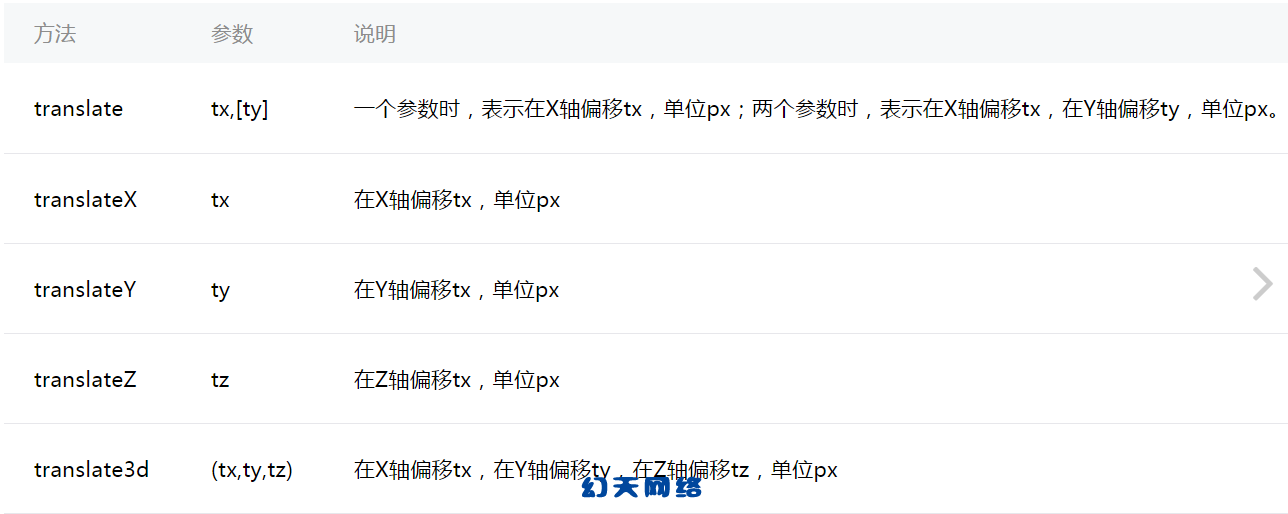
倾斜:

矩阵变形:
演示单个动画组效果
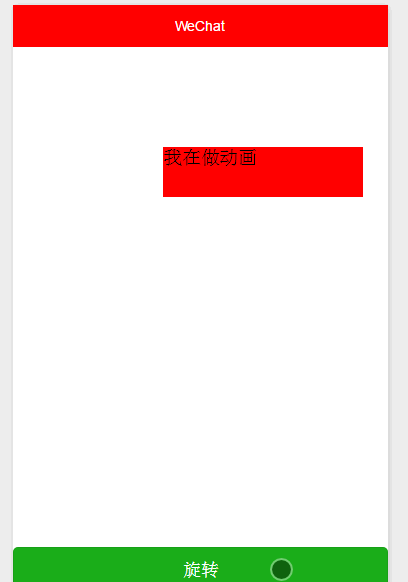
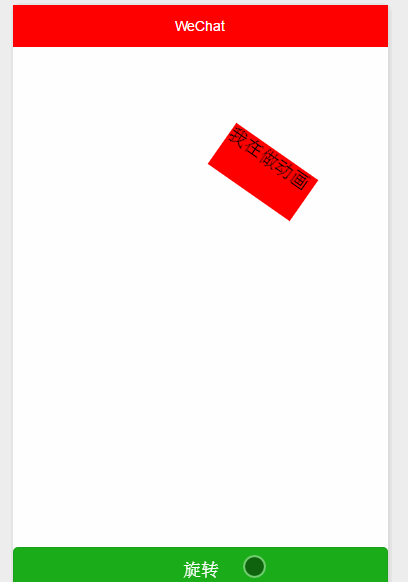
wxml
<view class="container">
  <view animation="{{animation}}" class="view">我在做动画</view>
</view>
<button type="primary" bindtap="rotate">旋转</button>
js
Page({
data:{
text:"Page animation",
animation: ''
},
onLoad:function(options){
},
onReady:function(){
this.animation = wx.createAnimation({
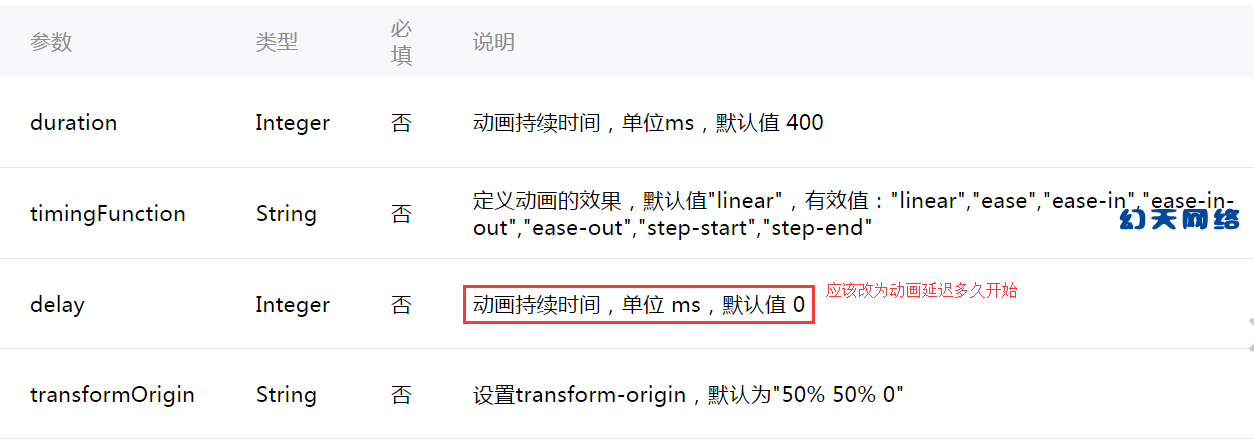
duration: 1000,
/**
* http://cubic-bezier.com/#0,0,.58,1
* linear 动画一直较为均匀
* ease 从匀速到加速在到匀速
* ease-in 缓慢到匀速
* ease-in-out 从缓慢到匀速再到缓慢
*
* http://www.tuicool.com/articles/neqMVr
* step-start 动画一开始就跳到 100% 直到动画持续时间结束 一闪而过
* step-end 保持 0% 的样式直到动画持续时间结束 一闪而过
*/
timingFunction: 'linear',
delay: 100,
/**
* 以什么为基点做动画 效果自己演示
* left,center right是水平方向取值,对应的百分值为left=0%;center=50%;right=100%
* top center bottom是垂直方向的取值,其中top=0%;center=50%;bottom=100%
*/
transformOrigin: 'left top 0',
success: function(res) {
console.log(res)
}
})
},
/**
* 旋转
*/
rotate: function() {
this.animation.rotate(150).step()
this.setData({
animation: this.animation.export()
})
},
onShow:function(){
},
onHide:function(){
},
onUnload:function(){
}
})
演示多个动画组效果
这里我们只需要更改以下代码即可
/**
* 旋转
*/
rotate: function() {
/**
* 动画顺序 顺时针旋转150度>x,y 放大二倍>x,y平移10px>x,y顺时针倾斜>改变样式和设置宽度宽度
*/
this.animation.rotate(150).step().scale(2).step().translate(10).step().skew(10).step().opacity(0.5).width(10).step({ducation: 8000})
this.setData({
animation: this.animation.export()
})
}